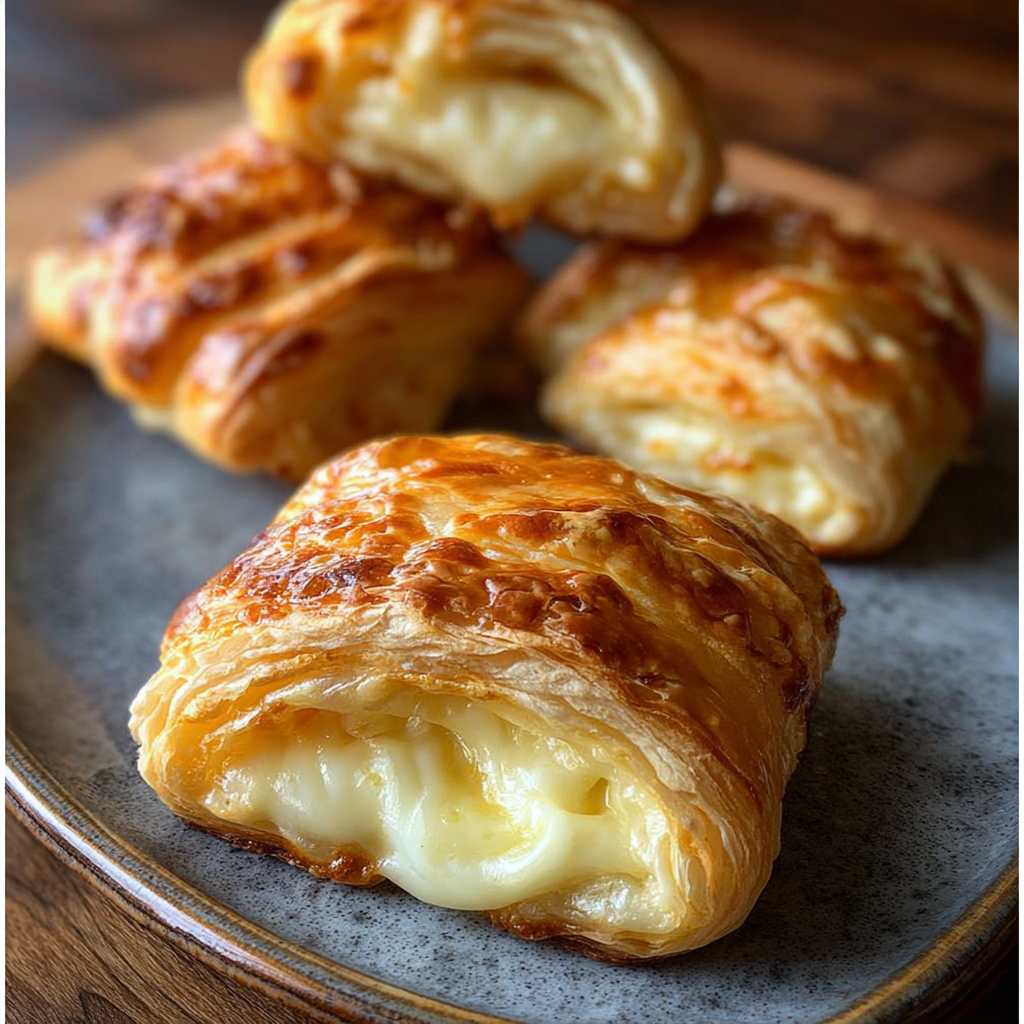
Homemade Cheese Danish
If you’ve ever strolled past a bakery window and gazed longingly at the glistening layers of a homemade cheese Danish, you’re not alone. This flaky, buttery pastry with its sweet, creamy filling is the perfect way to elevate your breakfast, brunch, or even dessert lineup.
In this guide, you’ll learn how to make a homemade cheese Danish that tastes like it came straight from a professional bakery—but at a fraction of the price and effort.
🧀 What Is a Cheese Danish?
A cheese Danish is a pastry made from buttery, layered dough (usually puff pastry) filled with a slightly sweetened cream cheese filling. The result is a treat that’s crispy on the outside, tender inside, and topped with a luscious icing drizzle.
Not only is it delicious, but it’s surprisingly easy to make at home using store-bought puff pastry.
If you’re unsure how to handle puff pastry, you’ll find this guide on how to work with puff pastry from King Arthur Baking extremely helpful. It covers everything from thawing to shaping for best flakiness.
To understand why butter makes pastry flaky, take a quick read through this article on the science of flaky pastries by Serious Eats. It’s a goldmine for home bakers who want to bake smarter, not just harder.
🛒 Ingredients You’ll Need For Homemade Cheese Danish
Here’s what you need to create your homemade cheese Danish masterpiece:
- 1 sheet puff pastry, thawed
- 8 oz cream cheese, softened
- ⅓ cup powdered sugar
- 1 tsp vanilla extract
- 1 egg (yolk and white separated)
- 1 pinch of salt
For the glaze:
- ½ cup powdered sugar
- ¼ tsp vanilla extract
- 2 tbsp milk
Optional add-ins:
- 1–2 tbsp of fruit jam (like strawberry or raspberry)
- Zest of lemon or orange for brightness
🔪 Kitchen Tools You’ll Need
- Mixing bowls
- Hand mixer or whisk
- Baking sheet
- Parchment paper
- Pastry brush
- Cooling rack (optional but helpful)
🧑🍳 Step-by-Step Instructions Of Homemade Cheese Danish
1. Prep the Pastry
- Thaw your puff pastry in the fridge for 1–2 hours.
- Preheat oven to 400°F and line a baking sheet with parchment paper.
- Unfold the puff pastry and cut it into 6 equal rectangles.
2. Make the Filling
- In a bowl, beat together cream cheese, powdered sugar, vanilla extract, egg yolk, and salt until smooth.
3. Assemble the Danish
- Use a fork to score a ½-inch border around each pastry rectangle.
- Spoon 1–2 tbsp of cream cheese filling onto the center of each piece.
- Beat the egg white until frothy and brush along the edges for golden color.
4. Bake
- Bake for 10 minutes, rotate the sheet, and bake another 5–10 minutes until puffed and golden brown.
5. Add Glaze
- Mix powdered sugar, vanilla, and milk to make the glaze.
- Let the cheese Danish cool before drizzling the icing over the top.
💡 Tips for Perfect Cheese Danish
Want to make a cheese Danish that looks and tastes like it came from a high-end bakery? These expert tips will help you master every step of the process and avoid common baking frustrations.
✅ Use Cold Ingredients
Keep your puff pastry and cream cheese chilled until you’re ready to work with them. Cold butter in the pastry creates those signature flaky layers, while chilled cream cheese holds its shape better during baking.
✅ Score a Border, Don’t Cut
Lightly scoring a ½-inch border around each pastry piece ensures the center stays flat and the edges puff up beautifully. Don’t slice through the dough—just make a shallow outline with a knife.
✅ Don’t Overwork the Pastry
Handle puff pastry as little as possible to avoid melting the butter or tearing the layers. Use a light touch and work quickly.
✅ Add a Flavor Boost
Enhance your cream cheese filling by mixing in a pinch of salt, a splash of vanilla extract, or a bit of citrus zest for brightness. For extra richness, try blending in a spoonful of sour cream.
✅ Cool Before Glazing
Let your pastries cool before drizzling the glaze to avoid it melting into the surface. This keeps the glaze distinct and attractive.
With these simple tips, you’ll get a perfectly golden, flaky, and mouthwatering cheese Danish every single time.
❌ Common Mistakes to Avoid
Even though homemade cheese Danish is relatively easy to make, a few simple mistakes can lead to soggy bottoms, flat pastries, or bland results. Here are the most common pitfalls to watch out for—and how to avoid them.
1. Improper Puff Pastry Thawing
Never thaw puff pastry at room temperature. Doing so causes the butter to melt too quickly, ruining the layers. Always thaw in the refrigerator for a couple of hours. If it’s still too stiff, leave it at room temperature for just 10 minutes before unfolding.
2. Overfilling the Pastry
It’s tempting to load up on the delicious cream cheese filling, but too much can leak out during baking or create a soggy base. Stick to about 1–2 tablespoons of filling per Danish.
3. Skipping the Border Score
Failing to score a ½-inch border around your pastry will cause the entire square to puff unevenly. This step helps the middle stay flat for the filling while the edges rise for that beautiful bakery-style look.
4. Applying Glaze Too Soon
If you drizzle glaze over a hot Danish, it will melt and soak in, making the pastry sticky and wet. Always let your Danishes cool for at least 15–20 minutes before glazing.
5. Not Using an Egg Wash
Egg wash gives your pastry a golden, glossy finish. Skipping it can leave your Danish looking dull and pale.
By avoiding these mistakes, you’ll get a perfectly puffed, crisp, and delicious cheese Danish every time—worthy of any bakery window.
🌀 Flavor Variations for Your Homemade Cheese Danish
One of the best things about making your own homemade cheese Danish is the endless variety of flavors you can explore. Once you’ve mastered the basic cream cheese filling and flaky puff pastry, it’s easy to personalize your danishes to match any occasion, season, or craving.
🍓 Fruit-Filled Danishes
Add a spoonful of fruit preserves or fresh fruit on top of the cream cheese layer before baking. Popular choices include:
- Strawberry jam or compote
- Raspberry preserves
- Blueberry pie filling
- Apple-cinnamon chunks
These variations not only enhance flavor but also create a beautiful pop of color on your pastry. For a fun twist, take inspiration from recipes like blueberry cheesecake rolls.
🍋 Citrus Zest
Mix in ½ teaspoon of lemon, orange, or lime zest into the cream cheese filling. This adds a refreshing brightness and pairs wonderfully with a powdered sugar glaze. You can also use lemon glaze for a zesty finish.
🍫 Decadent Dessert Twists
For chocolate lovers, add:
- Mini chocolate chips to the filling
- A drizzle of Nutella after baking
- A cocoa glaze over the top
You can even top the danish with crushed cookies or graham crackers for crunch.
🧀 Savory Cheese Danish
Skip the sugar in the filling and create a savory option using:
- Goat cheese with herbs
- Feta and spinach
- Mozzarella and sun-dried tomato
These are perfect for brunch buffets or light lunches.
🌿 Seasonal Specialties
Incorporate seasonal ingredients like:
- Pumpkin purée + spice in fall
- Cranberry-orange in winter
- Fresh peach slices in summer
Experiment and make it your own. With homemade cheese Danish, the possibilities are truly endless!
🧊 How to Store & Reheat
Cheese Danishes store well if handled properly:
- Room Temp: Up to 2 days in an airtight container.
- Fridge: Lasts up to 7 days. Place parchment paper between layers.
- Freezer: Freeze for up to 2 months. Reheat at 350°F for 5–10 minutes.
🥂 Serving Ideas
Your homemade cheese Danish pairs beautifully with:
- A hot latte or cappuccino
- Fresh berries and mint
- A glass of mimosa for brunches
- Lightly toasted almonds on top for crunch
🥖 Want to Make Your Own Danish Dough?
If you’re ready for the next level in pastry baking, you can make your own Danish dough instead of using puff pastry.
Basic ingredients:
- Flour
- Yeast
- Butter
- Eggs
- Milk
The process is similar to croissant-making with layers of butter folded into yeast dough, but it takes longer. Expect at least 6 hours with proofing and chilling.
❓ Frequently Asked Questions About Homemade Cheese Danish
Can I use crescent dough instead of puff pastry?
Yes! Crescent roll dough is softer and more bread-like but still works well for a quick and easy version.
Why is my cheese Danish soggy?
This usually happens if:
- The filling is too wet
- The pastry wasn’t properly scored
- The Danish wasn’t cooled before storing
How far in advance can I make them?
You can make and bake them up to 2 days ahead. Store in the fridge and reheat just before serving.
Can I make it egg-free?
Yes, substitute the egg yolk in the filling with 1 tbsp of Greek yogurt, and skip the egg wash or use plant-based milk for gloss.
Should I eat it hot or cold?
Either! Many people love cheese Danish warm, but it’s also delicious chilled.
🔎 Nutrition Snapshot (Per Danish)
- Calories: ~430
- Carbs: 38g
- Fat: 29g
- Protein: 6g
To lighten it up, use:
- Low-fat cream cheese
- Reduced sugar in glaze
- Less filling per Danish
🏁 Final Thoughts
Making a homemade cheese Danish is easier than most people think—and far more rewarding than picking one up at a bakery. With just a few simple ingredients like puff pastry, cream cheese, and sugar, you can create a flaky, creamy, and irresistibly delicious pastry in under 30 minutes. This recipe is flexible enough to suit your flavor preferences, whether you’re adding fruity jam, citrus zest, or sticking with the classic vanilla filling.
Not only is this cheese Danish perfect for a special breakfast or brunch, but it also makes a thoughtful homemade treat for guests, holidays, or everyday indulgence. Best of all, it’s incredibly cost-effective and can be made ahead of time, stored, and reheated without losing its flavor or texture.
If you enjoyed this recipe, consider exploring other pastry favorites like cinnamon roll pancakes or even a fruit-filled Danish twist. And don’t forget to check out our internal recipe guides for inspiration on complementary dishes.
Now that you’ve got the technique and tips, it’s time to roll up your sleeves and bring bakery-style flavor to your home kitchen. One bite and you’ll be hooked—because nothing beats the taste of a fresh, warm homemade cheese Danish.