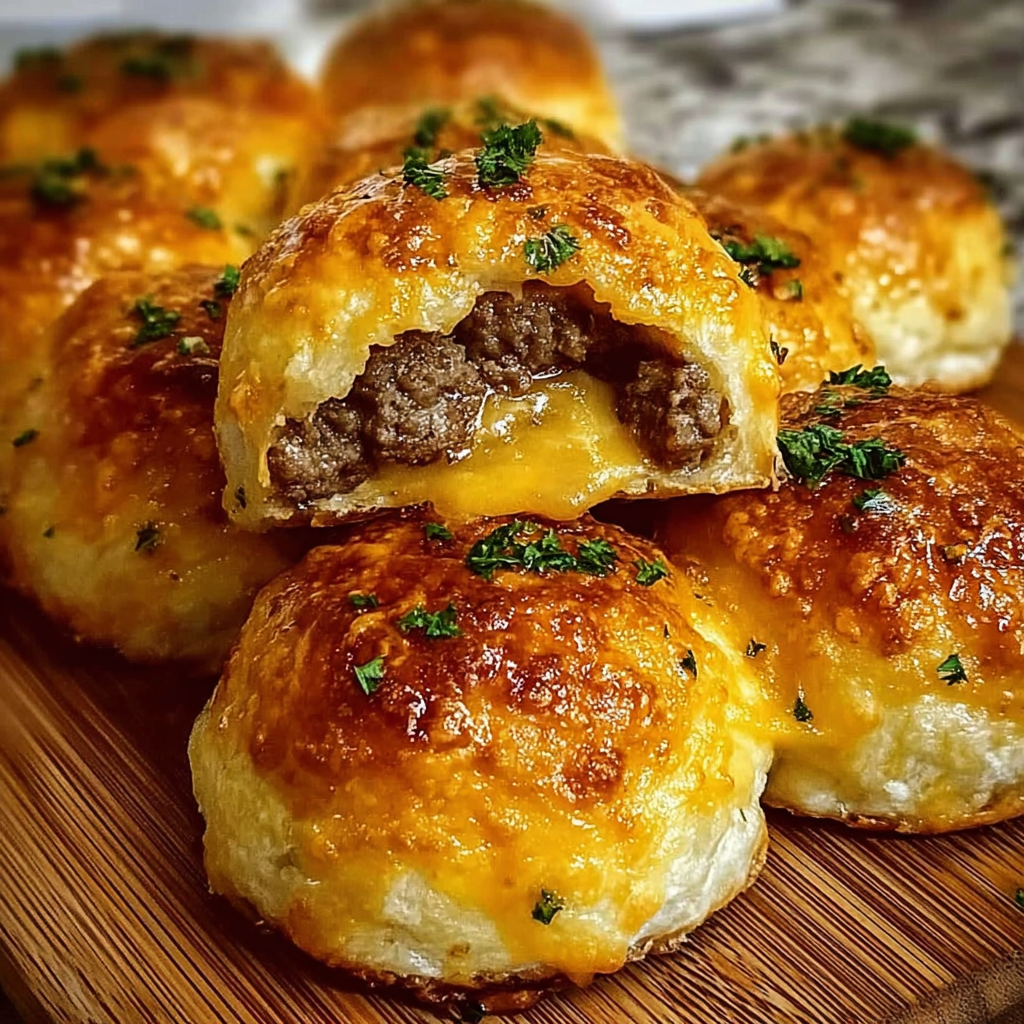
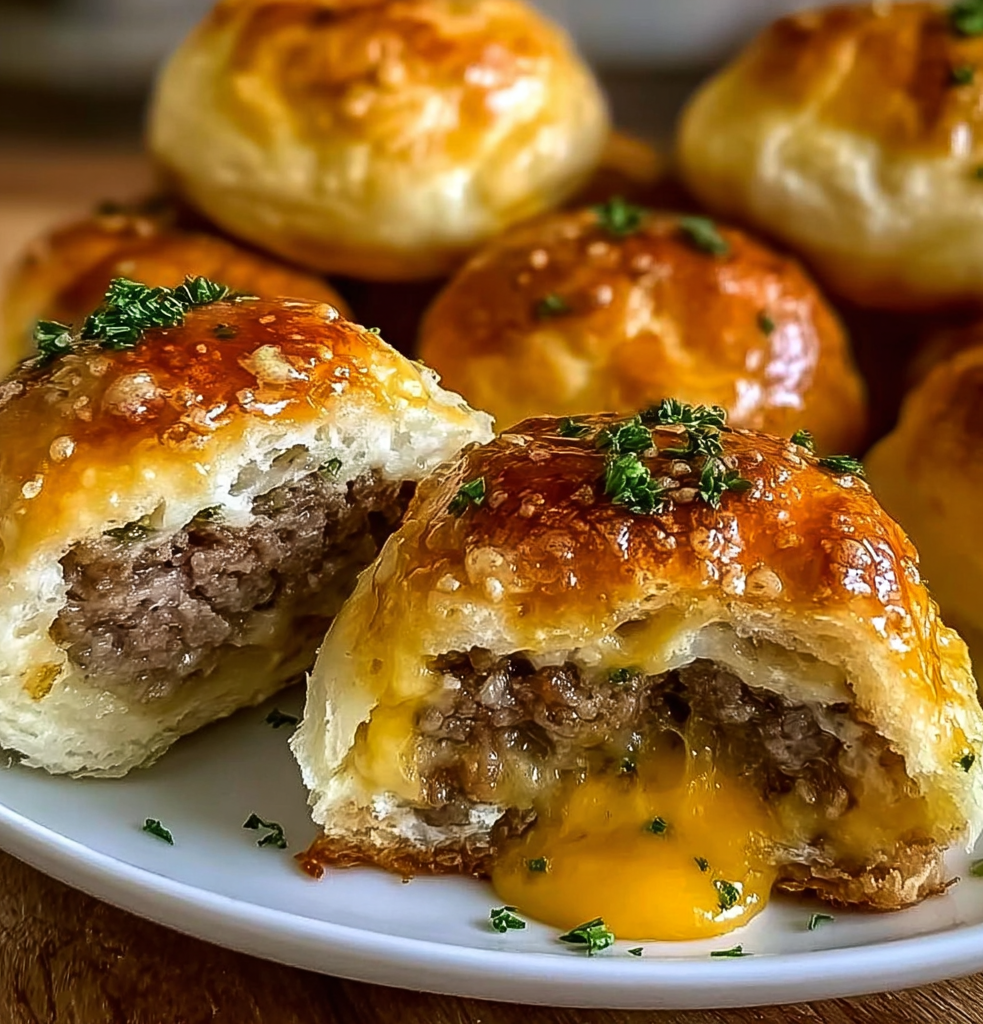
Garlic Parmesan Cheeseburger Bombs
If you’re craving a mouthwatering, cheesy, savory bite-sized snack that’s perfect for game day or family dinners, Garlic Parmesan Cheeseburger Bombs are your next kitchen obsession. These flavor-packed meat and cheese bundles wrapped in soft dough and brushed with garlic butter and parmesan are the ultimate crowd-pleaser.
Whether you’re making them for your kids, party guests, or just indulging yourself, this recipe gives you everything you need—from ingredients to air fryer alternatives and freezer tips.
🔥 Why You’ll Love These Cheeseburger Bombs
These cheeseburger bombs are:
- Crispy on the outside, gooey on the inside
- Super easy to customize with your favorite flavors
- Ready in under 30 minutes
- Freezer-friendly and meal-prep approved
Plus, when you use the right patty preparation, you can take these bites to the next level. Check out this in-depth burger texture guide from Serious Eats to learn how to build a better patty that won’t dry out in the oven.
🧀 Ingredients You’ll Need For Garlic Parmesan Cheeseburger Bombs
Here’s what goes into these golden, cheesy delights:
- 1 lb ground beef (or turkey for a leaner version)
- 1 cup shredded cheddar cheese
- 1/2 cup shredded mozzarella cheese
- 1 tsp garlic powder
- 1/2 tsp salt and black pepper
- 1 tbsp ketchup or BBQ sauce (optional)
- 1 tbsp minced onion
- 1 can refrigerated biscuit dough or crescent rolls
- 1/4 cup grated parmesan cheese
- 3 tbsp garlic butter (homemade or store-bought)
Want to make the butter from scratch? Here’s a step-by-step on how to make garlic butter at home.
👨🍳 How to Make Garlic Parmesan Cheeseburger Bombs
Follow these simple steps:
- Cook the beef mixture
- Brown the beef in a skillet over medium heat.
- Add onion, salt, pepper, ketchup (optional), and garlic powder.
- Stir in cheddar and mozzarella once the meat is slightly cooled.
- Prepare the dough
- Flatten each biscuit or crescent roll into a circle.
- Add 1–2 tablespoons of meat mixture in the center.
- Pinch the edges to seal the dough around the filling.
- Brush with garlic parmesan topping
- Mix garlic butter and grated parmesan.
- Brush each sealed dough ball generously on top.
- Bake or air fry
- Bake at 375°F for 12–15 minutes until golden brown.
- Air fryer option: 370°F for 8–10 minutes for extra crisp.
🌶️ Flavor Variations to Try
One of the best things about Garlic Parmesan Cheeseburger Bombs is how easily you can customize them to suit your taste buds. From spicy kicks to smoky BBQ twists, the possibilities are endless. Here are some irresistible flavor variations to try:
1. Bacon Cheeseburger Bombs
Add chopped, crispy bacon to your beef and cheese filling. The smoky crunch perfectly complements the gooey cheese and buttery biscuit dough. You can even sprinkle bacon bits on top before baking for extra indulgence.
2. Spicy Jalapeño Cheeseburger Bombs
If you love heat, mix in diced jalapeños or a splash of hot sauce into the meat mixture. For a Tex-Mex vibe, swap cheddar for pepper jack cheese and add a pinch of cumin or smoked paprika.
3. BBQ Cheeseburger Bombs
Replace ketchup with BBQ sauce in the beef mix and use sharp cheddar for a bold flavor. Brush the tops with a BBQ garlic butter for a sweet-and-savory finish. These pair great with a side of coleslaw or baked beans.
4. Mushroom & Swiss Bombs
Go gourmet with sautéed mushrooms, Swiss cheese, and caramelized onions. This variation offers a deep, umami-rich bite that feels upscale and comforting.
5. Breakfast Bombs
Try a morning twist! Use breakfast sausage instead of beef, add scrambled eggs, and swap in American or cheddar cheese. Serve with a side of salsa or gravy for dipping.
6. Vegetarian Cheeseburger Bombs
Use plant-based meat or a mix of sautéed mushrooms and black beans for a satisfying meatless option. Load up on veggies and your favorite cheese to keep it hearty and flavorful.
Also try pairing with easy stuffed potato cakes for an ultra-savory experience.
These variations allow you to reinvent the classic cheeseburger bomb and keep your family or guests guessing what flavor’s coming next. Experiment, mix, and match—because these bombs are always better when they’re uniquely yours!
🔁 Oven vs. Air Fryer vs. Deep Frying
| Method | Pros | Time |
|---|---|---|
| Oven | Consistent, hands-off | 12–15 mins |
| Air Fryer | Crispiest texture | 8–10 mins |
| Deep Frying | Indulgent, fast | 3–4 mins |
Pro Tip: For crisp edges and melt-in-your-mouth centers, air frying delivers top-tier texture.
🥗 How to Serve Garlic Parmesan Cheeseburger Bombs
These are perfect as:
- A party appetizer with dipping sauces
- Kid-friendly lunches
- Game night snacks
🔹 Great Dipping Sauces
- Ranch
- Garlic aioli
- Spicy mayo
- Classic ketchup
🔹 Side Dishes to Pair
- Coleslaw
- Sweet potato fries
- Pickles or pickle chips
🥣 Nutritional Information & Healthier Swaps
Estimated per bomb:
- Calories: ~220
- Protein: 10g
- Fat: 12g
- Carbs: 18g
Healthier Tweaks:
- Use ground turkey or plant-based meat
- Choose low-fat cheeses
- Opt for whole wheat or low-carb biscuit dough
❄️ How to Store and Reheat
Proper storage and reheating are key to keeping your Garlic Parmesan Cheeseburger Bombs tasting fresh, cheesy, and crisp—even days after baking.
Refrigerating Leftovers
Once cooled, store your cheeseburger bombs in an airtight container and refrigerate for up to 3 days. To prevent sogginess, place a paper towel at the bottom of the container to absorb excess moisture.
Freezing for Later
These bombs freeze beautifully and are perfect for meal prep or quick snacks.
- To freeze unbaked: Assemble the bombs, then place them on a baking sheet and freeze until solid. Transfer to a freezer bag and store for up to 2 months. Bake directly from frozen, adding a few extra minutes to the cooking time.
- To freeze baked: Let the bombs cool completely, then wrap each one individually in foil or plastic wrap. Store in a labeled freezer bag. Reheat from frozen for best texture.
How to Reheat Without Losing Crispiness
Air Fryer (Best Option):
- Preheat to 350°F
- Heat bombs for 4–6 minutes
- Rest for 1 minute before serving
Oven:
- Preheat to 350°F
- Place bombs on a baking tray
- Bake for 8–10 minutes
Microwave (Not Recommended):
While quick, the microwave can make the dough rubbery and the filling unevenly heated. Use only for emergencies, and cover with a damp paper towel.
With these simple storage and reheating methods, your cheeseburger bombs will stay just as delicious the next day—or next month!
⚠️ Common Mistakes to Avoid When Making Garlic Parmesan Cheeseburger Bombs
Even though Garlic Parmesan Cheeseburger Bombs are simple to make, a few common missteps can lead to disappointing results. Here are the top mistakes to watch for—and how to fix them:
1. Overfilling the Dough
It’s tempting to pack each bomb with as much filling as possible, but this often leads to leaks during baking. Stick to 1–2 tablespoons of the meat mixture to ensure the dough seals properly and doesn’t burst open.
2. Not Sealing the Edges Tightly
Poorly sealed edges allow cheese to escape and dough to flatten. Press the seams firmly together and pinch the top to create a secure seal. For added security, use a bit of water to help the dough stick.
3. Using Cold Filling
Cold or freshly cooked hot meat can affect the dough’s texture. Let the filling cool slightly before assembling to prevent soggy dough or uneven cooking.
4. Skipping the Garlic Butter Brush
The garlic butter isn’t just for flavor—it helps the bombs brown evenly and adds a crispy finish. Don’t skip it! You can also add a second coat halfway through baking for extra richness.
5. Baking at the Wrong Temperature
Too low, and the dough stays pale; too high, and the outside burns before the inside cooks. Stick to 375°F and monitor closely in the final minutes.
Avoiding these mistakes ensures your cheeseburger bombs come out golden, gooey, and perfect every time.
❓ Frequently Asked Questions (FAQs) About Garlic Parmesan Cheeseburger Bombs
What are cheeseburger bombs made of?
They’re made of a seasoned ground beef and cheese mixture wrapped in dough, then baked or fried.
Can I use crescent rolls instead of biscuit dough?
Absolutely! Crescent rolls work great for a flakier texture.
How do I prevent them from falling apart?
Ensure the dough is well-sealed and not too thin. Don’t overfill.
Are these freezer-friendly?
Yes. Wrap in foil or freezer-safe bags and reheat in the oven or air fryer.
Can I prep these ahead of time?
Definitely. Assemble them the night before and bake just before serving.
🍕 Related Recipes You’ll Love
- Cheesy pizza bombs
- Stuffed garlic knots
- Sloppy Joe sliders
- Loaded meatball cups
💬 Final Thoughts
Garlic Parmesan Cheeseburger Bombs are the ultimate fusion of comfort food and creative snacking. These savory, cheese-stuffed bites are easy to make, endlessly customizable, and guaranteed to be the star of any party platter or family dinner. With a golden crust brushed in rich garlic butter and a juicy, flavorful beef filling, they bring together the best parts of a cheeseburger and a biscuit into one irresistible bundle.
What makes this recipe even better is its versatility. You can switch up the meat, experiment with fillings like bacon or jalapeños, or even make a vegetarian version. Whether baked in the oven or crisped to perfection in the air fryer, these bombs deliver big flavor in a compact, mess-free format.
They’re also freezer-friendly, kid-approved, and pair beautifully with a variety of dipping sauces and sides—making them ideal for busy weeknights, casual entertaining, or prepping ahead for events.
So if you’re craving bold flavor, fun presentation, and cheesy satisfaction, Garlic Parmesan Cheeseburger Bombs should be your next kitchen creation. Don’t forget to explore related recipes like biscuit cheese bombs and creamy garlic wraps for even more tasty inspiration. Try them today—you won’t regret it.