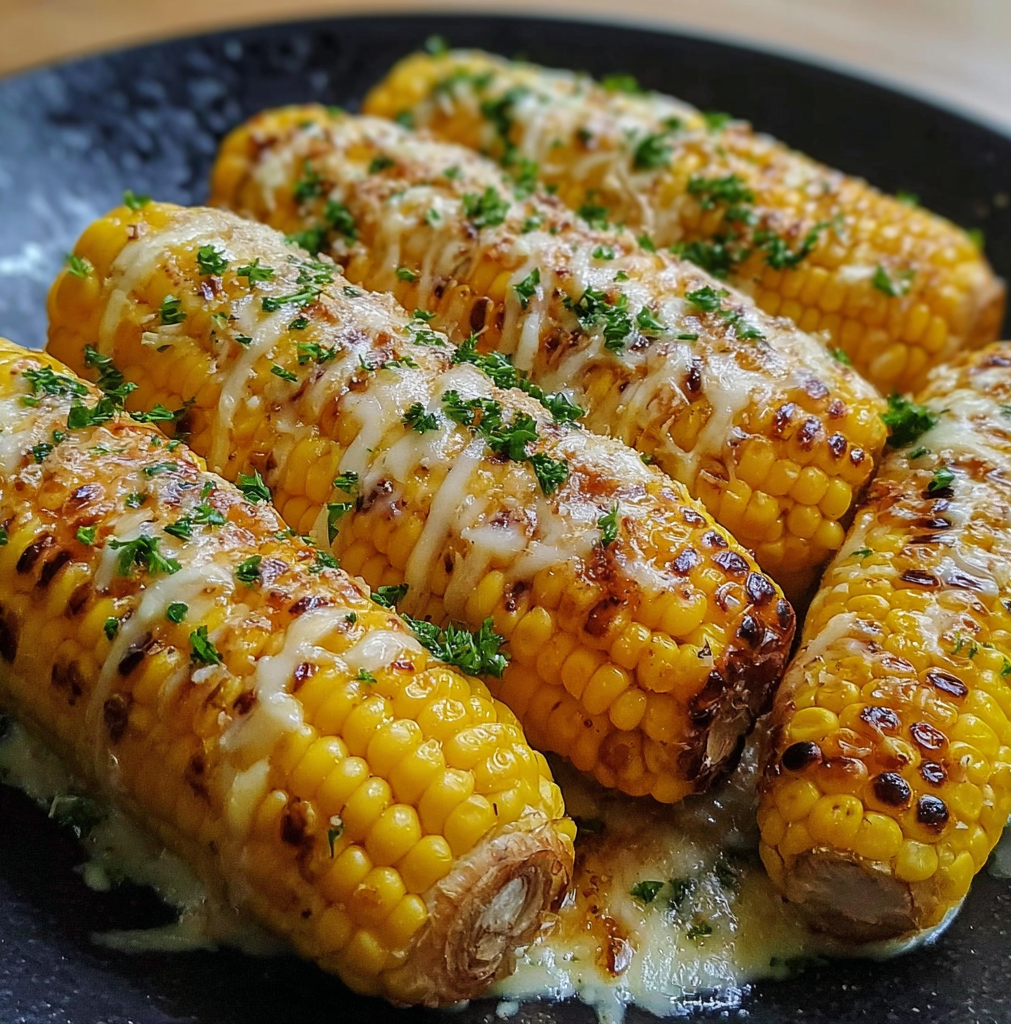
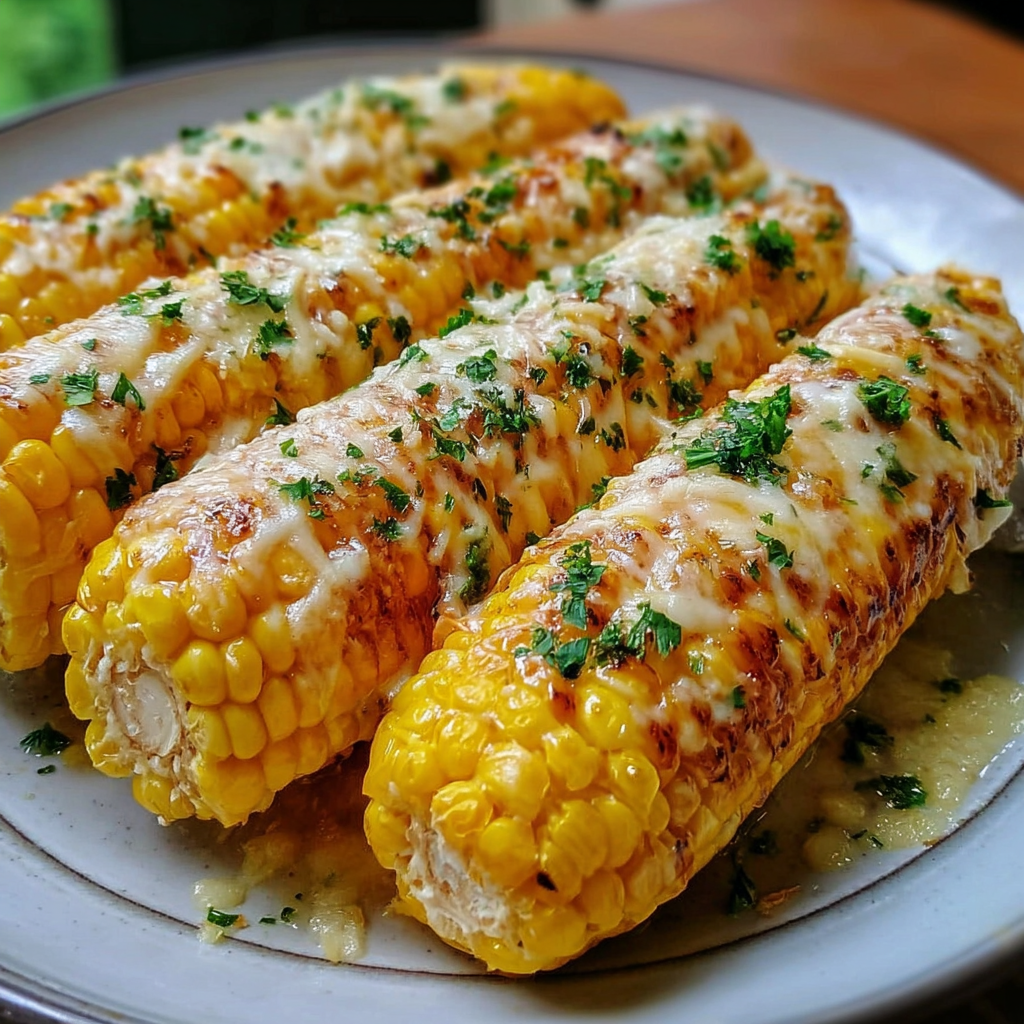
Garlic Butter Corn with Melty Cheese
Nothing says summer indulgence like hot, juicy corn slathered in garlic butter and topped with melty cheese. This dish combines savory richness with vibrant freshness—a street-food-inspired favorite that’s gone viral for all the right reasons.
Whether you’re hosting a backyard BBQ or looking for a decadent snack, Garlic Butter Corn with Melty Cheese checks every box. It’s quick, satisfying, and packed with bold flavors.
🌟 What Is Garlic Butter Corn with Melty Cheese?
Garlic Butter Corn with Melty Cheese is exactly what it sounds like—corn (typically grilled or roasted), brushed with garlic-infused butter, and finished with a generous layer of melted cheese. The heat from the corn helps the cheese melt into a gooey topping that’s hard to resist.
If you’ve ever wondered how to perfectly boil or grill corn before loading it with flavors, check out this guide on how to cook corn on the cob for foolproof techniques.
🧀 Why This Dish Is So Popular
- Combines umami, sweetness, and creaminess
- Highly customizable with various cheeses and spices
- Works as a snack, side, or party platter item
- Adaptable for both stovetop and oven cooking
- It’s trending on TikTok, Instagram, and in global street food culture
Want to choose the perfect cheese that melts like a dream? Check out this expert guide to the best melting cheeses to get started.
🛒 Ingredients Breakdown For Garlic Butter Corn with Melty Cheese
To make the perfect batch, you’ll need:
- 4 ears of corn (fresh is best, but frozen or canned works)
- ¼ cup unsalted butter, melted
- 3 cloves garlic, finely minced
- ½ tsp paprika
- ¼ tsp chili powder (optional for heat)
- Salt and pepper to taste
- 1 cup shredded cheese (mozzarella, cheddar, parmesan, or a blend)
- 1 tbsp chopped parsley (for garnish)
- ¼ cup heavy cream or milk (optional, for extra melt)
Pro Ingredient Tips:
- Mozzarella is a fan favorite for that stretchy effect
- Parmesan adds sharpness and depth
- Cotija works well for a Mexican-style twist
- Use garlic paste if you’re short on time
⚖️ Nutritional Snapshot
Here’s a rough breakdown (per serving):
- Calories: ~290 kcal
- Protein: ~7g
- Carbs: ~22g
- Fats: ~20g
Healthier Alternatives:
- Use olive oil instead of butter
- Swap regular cheese for low-fat mozzarella
- Add grilled veggies on the side for balance
Read more about the nutritional benefits of corn if you’re counting macros or meal planning.
🔪 Tools You’ll Need
Keep it simple with:
- A grater (for fresh cheese)
- A basting brush
- Baking tray or cast iron skillet
- Tongs or skewers
- Mixing bowl for garlic butter
🍳 How to Make Garlic Butter Corn with Melty Cheese
Step-by-Step Instructions:
- Pre-cook your corn:
- Boil for 5–7 minutes
- Or grill for char and smokiness
- Prepare garlic butter:
- In a small bowl, mix melted butter, garlic, paprika, chili powder, salt, and pepper
- Brush the corn generously:
- Coat each ear thoroughly while it’s still hot
- Add the cheese:
- Sprinkle over the top
- For extra melt: add a drizzle of cream or cover briefly to steam
- Finish with herbs:
- Add parsley or chives
- Optional step: Broil for 2–3 minutes for bubbling cheese top
🍽️ Serving Suggestions & Variations
Want to wow your guests? Try these creative spins:
Serving Styles:
- On the cob, as-is
- Cut into thirds for party skewers
- Removed from the cob and served in a bowl (cheesy corn salad)
Flavor Variations:
- Add lime juice and cotija for a Mexican elote feel
- Use Korean gochujang and mayo for K-corn vibes
- Top with crispy bacon or jalapeños
❌ Common Mistakes to Avoid When Making Garlic Butter Corn with Melty Cheese
While Garlic Butter Corn with Melty Cheese is a simple and crowd-pleasing recipe, a few small missteps can keep it from reaching its full, flavorful potential. Here are the most common mistakes—and how to avoid them:
1. Overcooking the Corn
Whether boiling, grilling, or roasting, corn should be tender but not mushy. Overcooked corn loses its natural sweetness and becomes tough or soggy. Stick to 5–7 minutes for boiling and keep a close eye when grilling.
2. Burning the Garlic
Garlic cooks quickly—especially in butter. If the heat is too high, it can become bitter. Always melt butter over medium-low heat, and stir in the garlic just until fragrant (no browning needed).
3. Using Low-Moisture or Pre-Shredded Cheese
Pre-shredded cheeses often contain anti-caking agents that prevent smooth melting. Always grate cheese fresh for the best melty texture.
4. Adding Cheese Too Early
Adding cheese before the corn is hot enough means it won’t melt properly. Ensure the corn is piping hot when you sprinkle on the cheese—or broil it briefly for bubbling goodness.
5. Skipping the Salt or Acid
Cheese and butter are rich, but the dish still needs salt and a touch of acidity (like lime or lemon juice) to balance flavors.
6. Serving Too Late
This dish is best served immediately while hot and gooey. Letting it sit too long can make the cheese rubbery and corn lukewarm.
Avoid these pitfalls, and you’ll have a side dish that’s indulgent, balanced, and absolutely unforgettable.
🧊 Storage & Reheating Tips
Leftovers of Garlic Butter Corn with Melty Cheese are rare—but if you do have some, don’t worry! With the right storage and reheating techniques, you can enjoy this dish again without losing its cheesy, garlicky goodness. Here’s how to keep your corn fresh and delicious:
Storage Tips:
- Cool Before Storing: Allow the corn to cool to room temperature before packaging. Storing it while still hot can create condensation and lead to soggy texture.
- Wrap Individually: Wrap each ear of corn in aluminum foil to lock in moisture and prevent the cheese from sticking to containers.
- Use Airtight Containers: Place foil-wrapped corn in an airtight container or zip-top bag to maintain freshness and avoid absorbing fridge odors.
- Refrigerate Promptly: Store in the fridge within 2 hours of cooking. It will stay fresh for up to 3 days.
Reheating Tips:
- Oven (Best Method): Preheat oven to 375°F (190°C). Place the wrapped corn on a baking tray and heat for 10–12 minutes until the cheese is melted and the corn is hot.
- Microwave: Unwrap and place the corn on a microwave-safe plate. Cover with a damp paper towel and heat for 45–60 seconds. This helps retain moisture without drying the cheese.
- Air Fryer (For Crispy Cheese): Heat at 350°F (175°C) for 5–6 minutes. This method gives the cheese a slightly crisp edge.
Pair reheated corn with crispy leftovers like fried sliced mushrooms with ranch for a crunchy contrast.
Proper storage and reheating keep your leftovers tasting just as indulgent as day one!
🥳 Make-Ahead Tips for Parties
Planning to serve Garlic Butter Corn with Melty Cheese at a party or gathering? Great choice! It’s festive, flavorful, and always a crowd-pleaser. But if you’re cooking for a group, you’ll want to stay organized and avoid last-minute stress. Here’s how to prepare this dish ahead of time without sacrificing taste or texture.
1. Prep the Garlic Butter Early
Mix the melted butter, minced garlic, and seasonings up to 2 days in advance. Store it in an airtight container in the refrigerator. Reheat gently before use to bring out the aroma.
2. Grate Cheese Ahead of Time
Shred your cheeses (mozzarella, cheddar, parmesan, etc.) and store them in zip-top bags or sealed containers. This not only saves time but also prevents last-minute mess.
3. Pre-Cook the Corn
You can boil or grill the corn a few hours in advance. Once cooked, wrap each ear in foil and refrigerate. Before serving, warm them up in the oven or on a grill.
4. Assemble Just Before Serving
Brush on the garlic butter and sprinkle the cheese while reheating the corn. For a golden-brown cheesy finish, broil for 2–3 minutes right before guests arrive.
5. Skewer for Easy Serving
Cut corn into thirds or halves and insert skewers for grab-and-go portions. It’s more party-friendly and keeps hands clean.
With these simple make-ahead tips, you’ll be free to enjoy your party while serving a dish that’s hot, cheesy, and full of flavor—just the way it should be!
❓ FAQs About Garlic Butter Corn with Melty Cheese
Can I use frozen corn?
Yes! Just boil or steam it before applying toppings. Frozen kernels also work well in a skillet version.
What’s the best cheese for melting?
Mozzarella, cheddar, and Monterey Jack are all great options. Use a blend for flavor and texture.
Is this vegetarian-friendly?
Absolutely, as long as you use vegetarian cheese (some cheeses contain animal rennet).
How do I prevent soggy cheese?
Use high-moisture corn and melt the cheese right before serving. Don’t cover it tightly during storage.
Can it be made in an air fryer?
Yes! Pre-cook the corn, apply butter and cheese, and pop it in at 375°F for 5–7 minutes.
🏁 Final Thoughts: Make It Tonight!
Garlic Butter Corn with Melty Cheese is the kind of dish that instantly elevates any meal. Whether you’re planning a summer cookout, craving a cozy comfort snack, or just want to upgrade your usual corn routine, this recipe delivers every time. With its rich garlic butter, gooey cheese topping, and smoky corn base, it’s a flavor explosion that pleases both kids and adults alike.
What makes this recipe stand out is its simplicity and versatility. You can keep it classic with mozzarella or cheddar, or experiment with ingredients like cotija, feta, or even a drizzle of heavy cream for added indulgence. It pairs beautifully with grilled meats, BBQ staples, or even lighter dishes like salads and roasted veggies.
If you’re already a fan of garlic butter chicken, cheesy pasta, or baked sliders, this corn dish will feel right at home on your dinner table. It’s quick to prep, easy to customize, and guaranteed to disappear fast.
So go ahead—add it to your next meal plan, bring it to a party, or enjoy it as a solo indulgence. Either way, Garlic Butter Corn with Melty Cheese is about to become your new favorite side dish.


One Comment